

Installing Yadle » Self-Hosted » Air-Gapped
For Self-Hosted (Air-Gapped) deployments, there are four components that will be installed:
- Yadle server: Provides the Web app, backend database, API, and ElasticSearch.
- Yadle server microservices: Performs all AI and non-AI file tagging, applies filetype icons for files that don’t receive thumbnails, and generates image sequence scrubbable thumbnails.
- Yadle agent: Scans files.
- Yadle agent microservices: Extracts embedded metadata and generates all thumbnail previews.
The following is an installation guide for non internet connected or air-gapped systems.
Note:- The Yadle Self-Hosted installer is a collection of bash scripts that will execute the steps needed to download, deploy, and configure Docker containers on your host machine.
- A pre-install check will run first, making sure the host system has all required packages installed and necessary system resources.
- The installer can be run multiple times without issue. Each time it is run, it examines and determines the state of the container, repairing or configuring any elements that are not correct.
- The scripts will output many messages. Progress messages will be displayed as the Docker images are downloaded, containers started and configured.
- Any problems will be displayed in red text and the scripts will stop.
- Successful installation will output docker status and “Installation Completed”.
1. Download Yadle Self Hosted Installer on Internet Connected System
a. The Yadle selfhosted installer can be downloaded from https://download.yadle.com/installer/yadle_installer.tar.gz or using curl in terminal.
$ curl -O https://download.yadle.com/installer/yadle_installer.tar.gz
b. Once downloaded, extract the contents of yadle_installer.tar.gz.
$ tar -xzf yadle_installer.tar.gz
2. Copy install_config File to Yadle Self-Hosted Installer Directory
Yadle will provide you with a install_config file that contains installation parameters and keys specific to your organization.Copy the install_config file to the extracted Yadle installer directory.
$ cp install_config yadle_installer/
3. Download Yadle server Docker Images
This step will only download the Docker images for the Yadle server and server microservices. Nothing will be installed at this time. Be sure to include the --download-only flag.
The script must be run as a sudoer or root user.
$ sudo ./install_yadle_servers --download-only
When prompted, type 3 and press Enter to download all Yadle server side images.
4. Download Yadle agent Docker Images
This step will only download the Docker images for the Yadle agent and agent microservices. Nothing will be installed at this time. Be sure to include the --download-only flag.
The script must be run as a sudoer or root user.
$ sudo ./install_yadle_agent --download-only
When prompted, type 3 and press Enter to download Yadle agent and agent microservices images.
5. Copy Downloaded Yadle Components to Air-Gapped Host
After downloading all Yadle Docker images, next you will need to get these onto the air-gapped Yadle host.
a. Copy the entire Yadle installation directory (Default: /opt/yadle) on the internet connected system used to download the Yadle Docker images to the /opt directory on the Air-Gapped Yadle host system.
You can use scp to copy the contents over if the two systems are accessible via a local network.
$ scp -r /opt/yadle root@<yadle_airgapped_host>:/opt
b. You will also need to copy over the yadle_installer directory containing the installation scripts and install_config file. Where this gets copied to on the Yadle air-gapped host does not matter. Here it is being copied to the home directory of Yadle host machine.
$ scp -r ./yadle_installer root@<yadle_airgapped_host>:~
6. Copy Certificate and Key to SSL Directory
Yadle Self-Hosted deployments are configured by default to use https protocol for secure communication with the web app, API server, and database. Replace <org> with the name of your organization.a. Create the ssl directory that will hold your certificate and key.
$ sudo mkdir -p /opt/yadle/servers/config/ssl
b. Copy your .crt certificate to the ssl directory. The certificate file must follow this naming convention: <org>.com.chained.crt.
$ sudo cp <your_certificate_name>.crt /opt/yadle/servers/config/ssl/<org>.com.chained.crt
c. Copy your key .pem to the ssl directory. The key file must follow this naming convention: privatekey.pem.
$ sudo cp <your_key_name>.pem /opt/yadle/servers/config/ssl/privatekey.pem
d. Generate a dhparam.pem file in the ssl directory by running the following command:
Note:- This can take several minutes to complete.
$ sudo openssl dhparam -out /opt/yadle/servers/config/ssl/dhparam.pem 4096
7. Run Yadle server Installer on Air-Gapped Host
The Yadle server installer will execute three separate scripts in the following order:- Pre-install check
- Install Yadle server
- install Yadle server microservices
a. Go to the location where the yadle_installer directory was copied to in Step 5.
$ cd ~/yadle_installer
b. The script must be run as a sudoer or root user.
$ sudo ./install_yadle_servers
8. Run Yadle agent Installer on Air-Gapped Host
The Yadle agent installer will execute three separate scripts in the following order:- Pre-install check
- Install Yadle agent
- install Yadle agent microservices
The script must be run as a sudoer or root user.
$ sudo ./install_yadle_agent
9. Confirm running Yadle containers
Run the following to verify all SaaS Yadle containers have been started and are running. The command must be run as sudoer or root user since Docker is being invoked.
$ sudo docker ps
The following containers should be listed in output:
NAMES
<org>_changes_mode_video-thumbnails_1
<org>_changes_mode_small-thumbnails_1
<org>_changes_mode_exif_1
<org>_changes_mode_ocr_1
<org>_changes_mode_medium-thumbnails_1
<org>_changes_mode_red-thumbnails_1
<org>_geo_changes_mode_geometry-thumbnails_1
<org>_yadle_agent
<org>_changes_mode_imagehash_1
<org>_changes_mode_tags_1
<org>_changes_mode_aitags-colossus_1
<org>_changes_mode_aitags-krell_1
<org>_changes_mode_filetype-icons_1
<org>_changes_mode_filesequence-thumbnails_1
<org>_yadle_es
<org>_yadle_servers
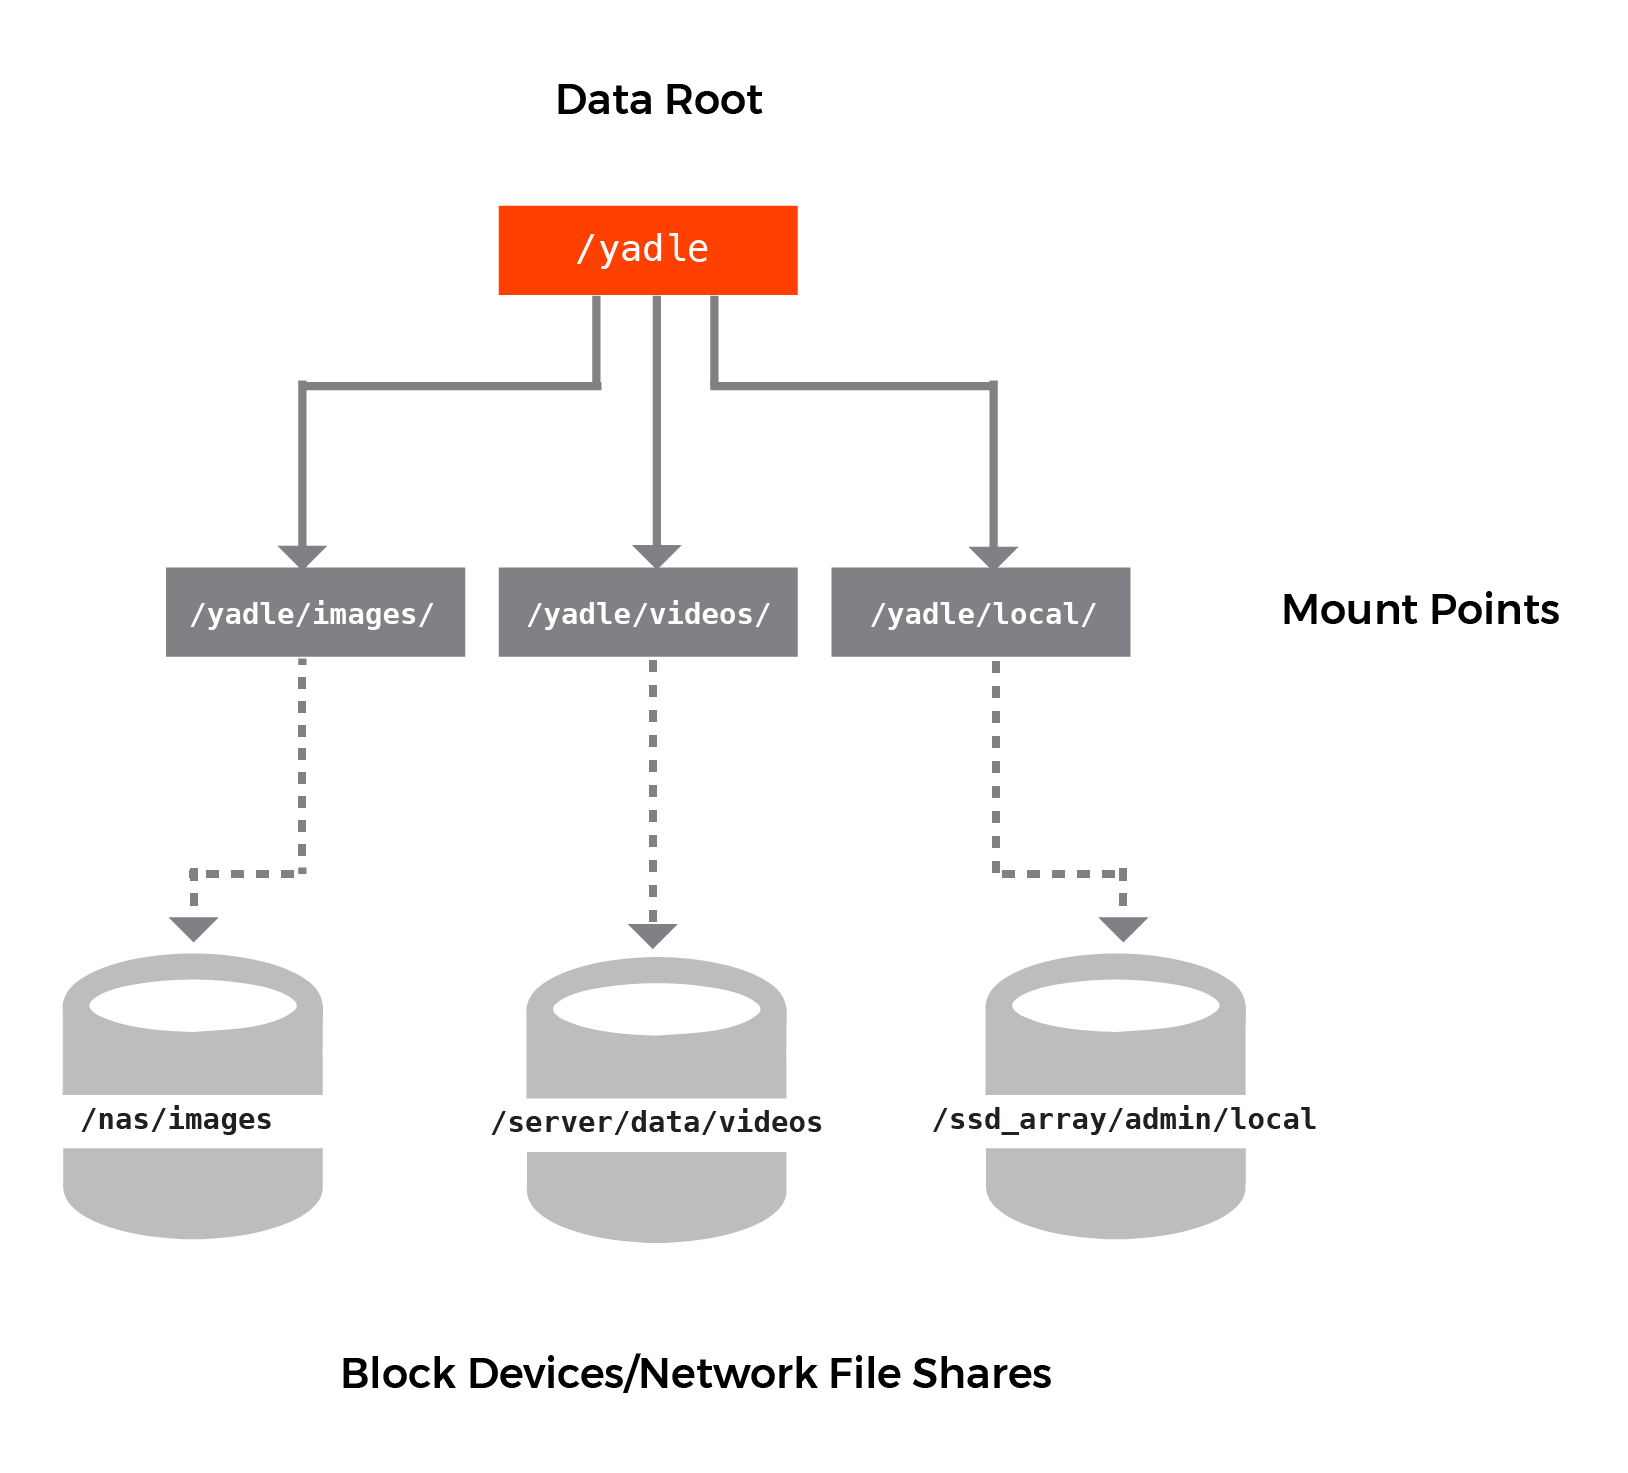
10. Mounting File Systems to Scan with Yadle Under Data Root
After successful installation of the 4 Yadle components (server, server microservices, agent, agent microservices), the next step is to mount the desired file systems to be scanned by Yadle under the specified Data Root Path.
Let’s imagine you have three network volumes that you want to scan with Yadle:
/nas/images
/server/data/videos
/ssd_array/admin/local
The above three network volumes are mounted on the Yadle data root path /yadle with the following mount points:
/nas/images —> /yadle/images//server/data/videos —> /yadle/videos/
/ssd_array/admin/local —> /yadle/local/
Note:
- The Yadle agent only requires read access to mounted filesystems. Best practice to mount as read-only.
- It is recommended to add these mounts to /etc/fstab so that they are mounted each time the Yadle agent host system starts.
- Whenever additional filesystems are mounted under the Data Root, the Yadle agent and agent microservices need to be restarted (See Step 11).
11. Restart Yadle agent and agent microservices.
After mounting the desired file systems to be scanned by Yadle, restart both the Yadle agent and agent microservices. This is necessary for the containers to be able to access the newly mounted file systems.
a. Restart Yadle agent:
$ cd /opt/yadle/agent
$ sudo ./stop_yadle
$ sudo ./start_yadle
b. Restart Yadle agent microservices:
$ cd /opt/yadle/microservices/agent
$ sudo ./stop_yadle
$ sudo ./start_yadle
Once both agent and agent microservices have been restarted, proceed to the Setting up Yadle section of the online documentation to begin configuring Yadle Scan Paths.